Split VPN tunelling for selected applications (Windows, Linux, macOS)
2020-11-11
In this tutorial we will create a local proxy for our VPN using Docker and binhex/arch-delugevpn
Windows
Installing WSL2
IMPORTANT: At the moment of writing, Microsoft's version of the Linux kernel does not include the Wireguard module by default. You can try your luck by compiling the kernel and the module manually, but I didn't manage to make it work on my machine. Hence, I recommend using OpenVPN with Windows.
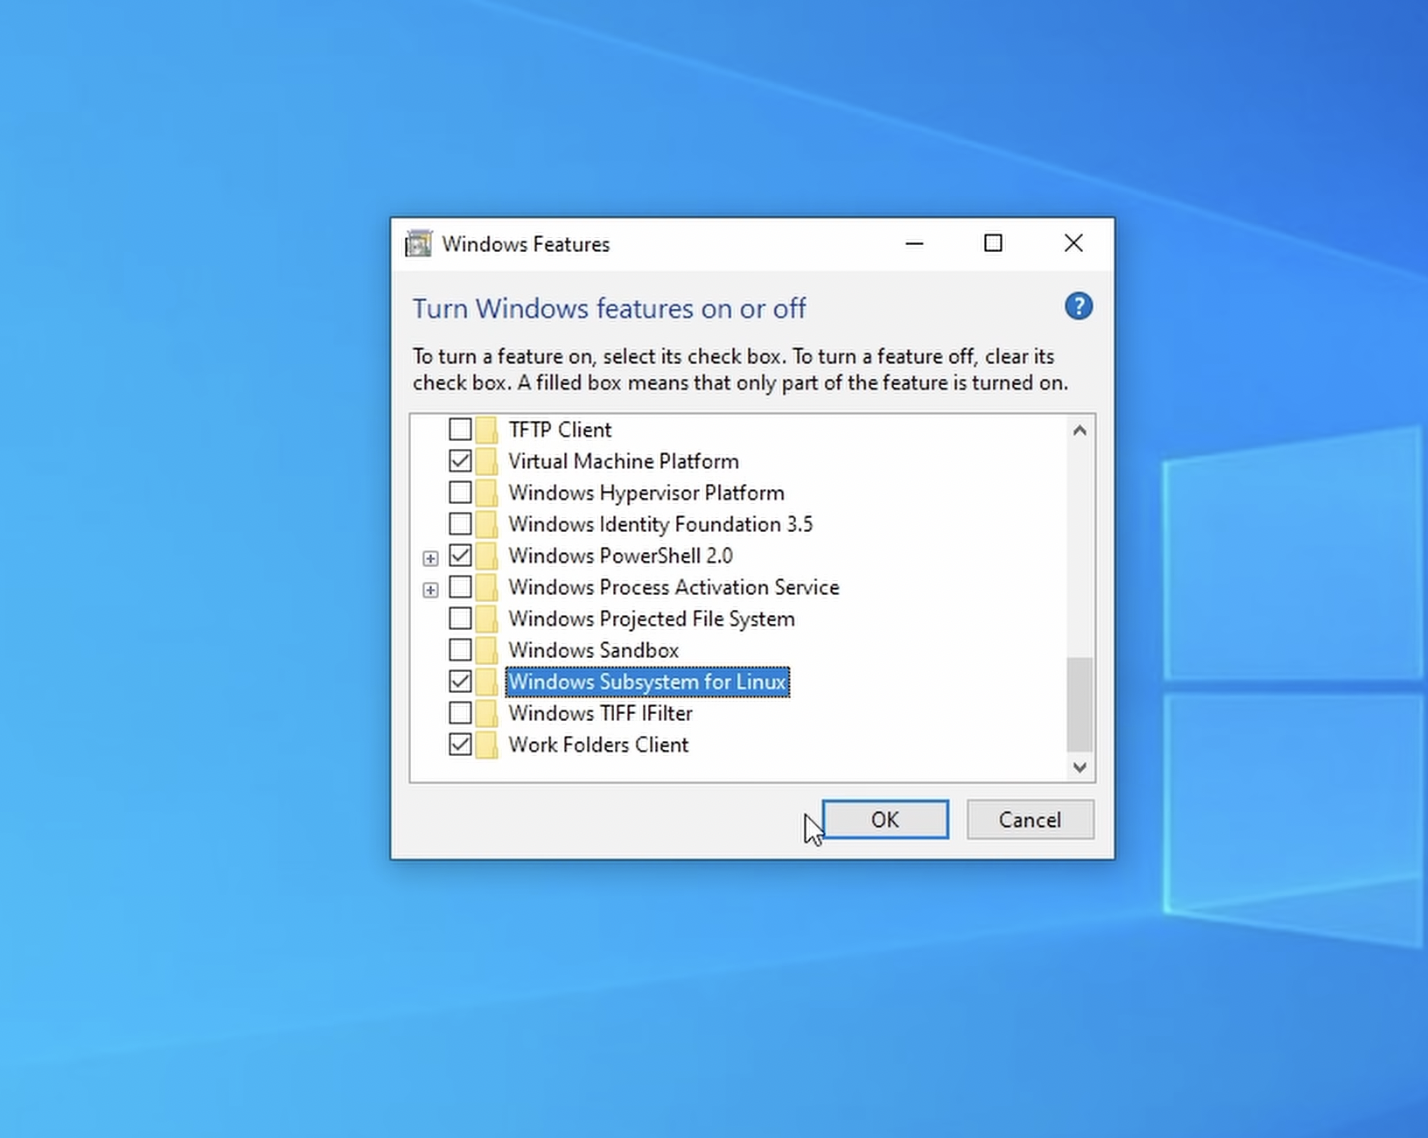
Open the start menu and type “Turn". Click on the first result, Turn Windows features on or off. Here we need to enable two things — Virtual Machine Platform and Windows Subsystem for Linux.
You can also do the same by typing the following commands in Powershell:
dism.exe /online /enable-feature /featurename:Microsoft-Windows-Subsystem-Linux /all /norestart
dism.exe /online /enable-feature /featurename:VirtualMachinePlatform /all /norestart
After that, we need to restart Windows to complete the installation – press the Restart now button.
After Windows starts up, go to the Start Menu again and type "power". Open PowerShell and type wsl --set-default-version 2. After that, download the Linux kernel update for WSL2 and install it.
Installing Docker Desktop
Download Docker Desktop for Windows from the official Docker website. After the installation is complete, press Close and log out.
Installing Ubuntu 20.04
After you log back in, you'll see the Docker Desktop screen. But before configuring docker, we need to install a WSL distro from which we're going to use in order to manage our container.
Open Microsoft Store and search for your favorite distribution. Personally, I recommend Ubuntu 20.04 LTS
Once that's installed, click on "Launch". Type in your desired username and password in the terminal, and after that you should get the bash prompt.
Now go back to Docker Desktop, open the Settings and untick the "Send usage statistics". Then, go to Resources > WSL INTEGRATION and enable "Ubuntu 20.04". Close the Linux terminal window and open it again from the Start menu.

Creating folders and writing a compose file
In the Linux terminal, type:
This will create a folder named docker in your Windows user's directory and all the necessary subfolders.
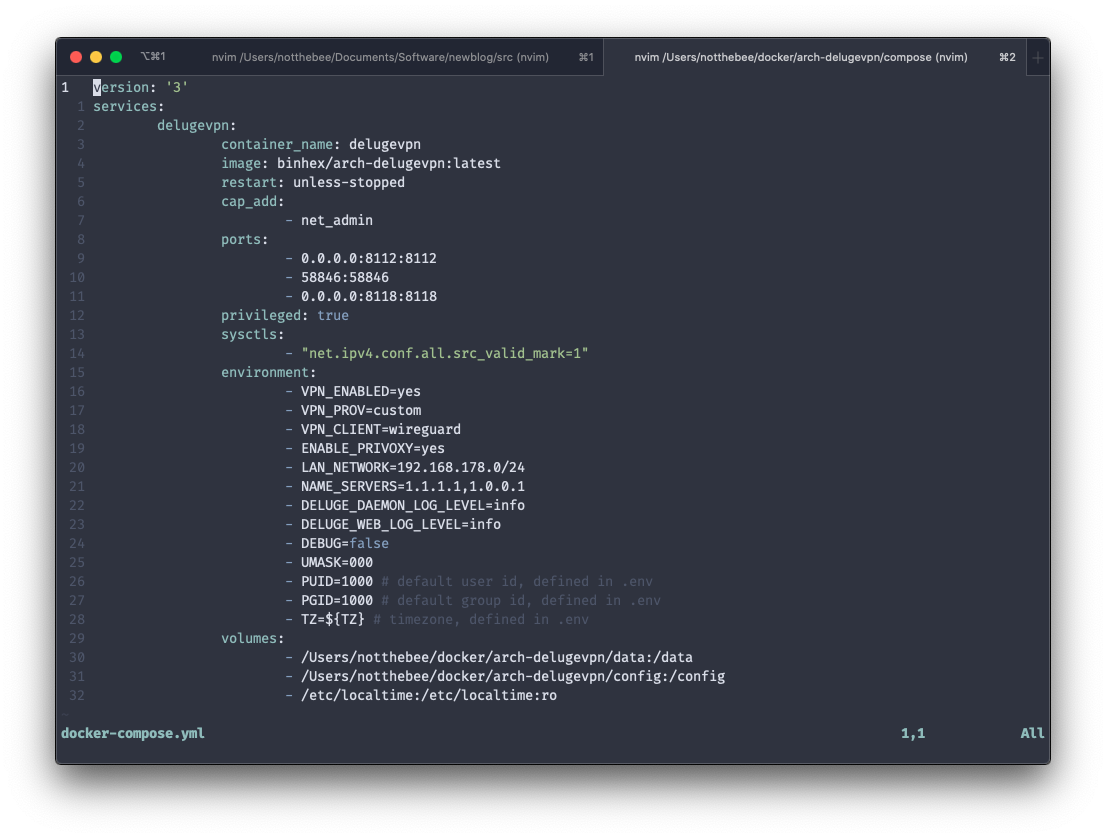
Now create a file named docker-compose.yml in the compose folder with the following contents:
version: '3'
services:
        delugevpn:
                container_name: delugevpn
                image: binhex/arch-delugevpn:latest
                restart: unless-stopped
                cap_add:
                        - net_admin # Necessary for OpenVPN
                ports:
                        - 0.0.0.0:8112:8112
                        - 58846:58846
                        - 0.0.0.0:8118:8118
                environment:
                        - VPN_ENABLED=yes
                        - VPN_PROV=custom
                        - VPN_CLIENT=openvpn
                        - ENABLE_PRIVOXY=yes
                        - LAN_NETWORK=192.168.178.0/24 # Replace with your network's IP
                        - NAME_SERVERS=1.1.1.1,1.0.0.1
                        - DELUGE_DAEMON_LOG_LEVEL=info
                        - DELUGE_WEB_LOG_LEVEL=info
                        - DEBUG=false
                        - UMASK=000
                        - PUID=1000
                        - PGID=1000
                        - TZ=Europe/Amsterdam # Replace with your timezone – check https://en.wikipedia.org/wiki/List_of_tz_database_time_zones for reference
                volumes:
                        - /mnt/c/Users/WINDOWS_USER_NAME/docker/arch-delugevpn/data:/data # Replace WINDOWS_USER_NAME with your actual username
                        - /mnt/c/Users/WINDOWS_USER_NAME/docker/arch-delugevpn/config:/config
                        - /etc/localtime:/etc/localtime:ro
Some additional information for the parameters:
VPN_PROV— set it tocustomif you're using a self-hosted VPN. There are also some other options, such aspiaorairvpn, check out the container documentation if you're interestedVPN_CLIENT— You can set it either toopenvpnorwireguard— once again, I couldn't make Wireguard work on Windows, so I will be using OpenVPNLAN_NETWORK— If you don't know the IP of your LAN network, open a PowerShell window and typeipconfig. Copy the first three numbers from theIPv4 Addressfield and paste them to theLAN_NETWORKfield in the compose file. Append a 0 as the fourth number and add/24at the end.- In the
volumessection you need to expose the config and downloads folders, as well as the localtime file to the container. The latter will remain the same in any case, no matter which folders you created, but for the first two — put the path to the folder on your local machine on the left and the path in the container on the right. In this case, the container path for config folder is/configand the downloads are located in/data/incompleteby default, but you can put them anywhere and change the download path in the torrent client later.
Running the container
Once you're done, save the file and quit. Now we're ready to run our container — type docker-compose up -d. But once that's done — wait for about 10 seconds, and if you did everything correctly you should be able to see Privoxy process listening on port 8118 when you type docker logs delugevpn.
Working with Deluge
Open a browser and go to localhost:8112. You will get a password prompt and the default password here is "deluge". You can change it latter in the settings.
Privoxy proxy
You can now access the proxy by pointing your applications to localhost:8112. Here's an example of what that looks like in Firefox:
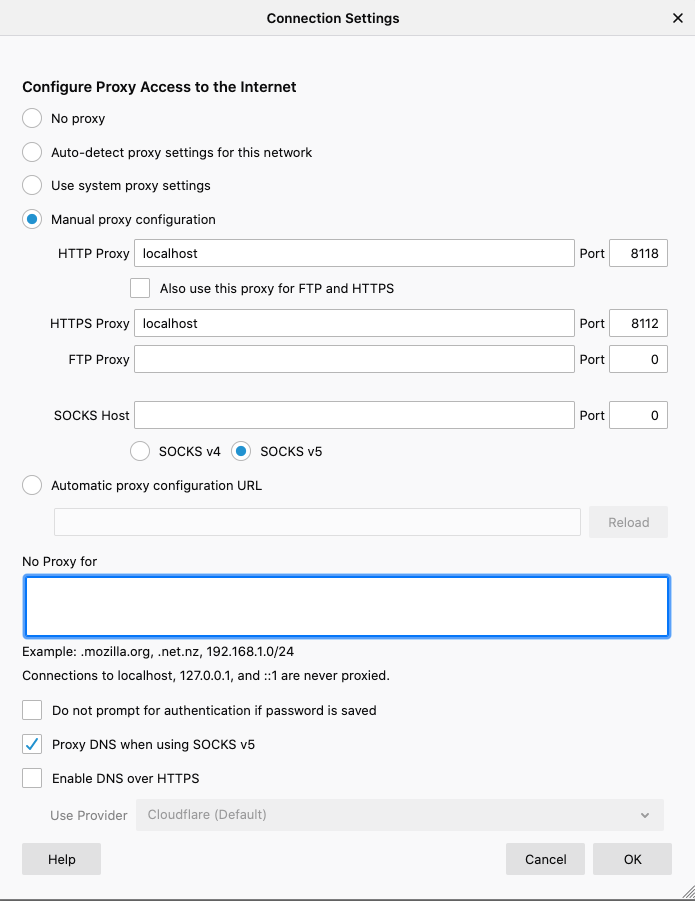
Privoxy also features ad/tracker filtering and other functinonality. To access the settings, open http://config.privoxy.org in your browser. You can also use FoxyProxy in Firefox for advanced whitelisting/blacklisting functionality with regular expressions.
Linux
On Linux this whole process takes less than 5 minutes. Open a terminal and type the following commands:
The docker-compose.yml will look a little bit different for Wireguard. In particular, we need to add the following lines:
                privileged: true
                sysctls:
                        - "net.ipv4.conf.all.src_valid_mark=1"
Now reboot. After booting up you can launch the container by running docker-compose up -d
macOS
On macOS the process is similar to Windows with a few exceptions:
- Wireguard actually works
- Docker Desktop is available in Homebrew repositories. To install it, type
brew cask install docker - The performance might be slightly inferior to Windows, since macOS doesn't feature WSL2